Tuesday, May 27, 2014

Pizza Stuffed Mushrooms


The man of the house always seems to amaze me! I bought Baby Bella Mushrooms because I thought he would like them for our burgers, as he always does. So when I walked in the kitchen to see how the burger prepping was going, I was surprised that instead of slicing the mushrooms with onions for the grill, he was prepping to stuff them. What?! Never thought he'd think of something so "gourmet" as that, lol! I asked him what he planned on stuffing them with and he said pepperoni and cheese. So I gave him a few suggestions and then 
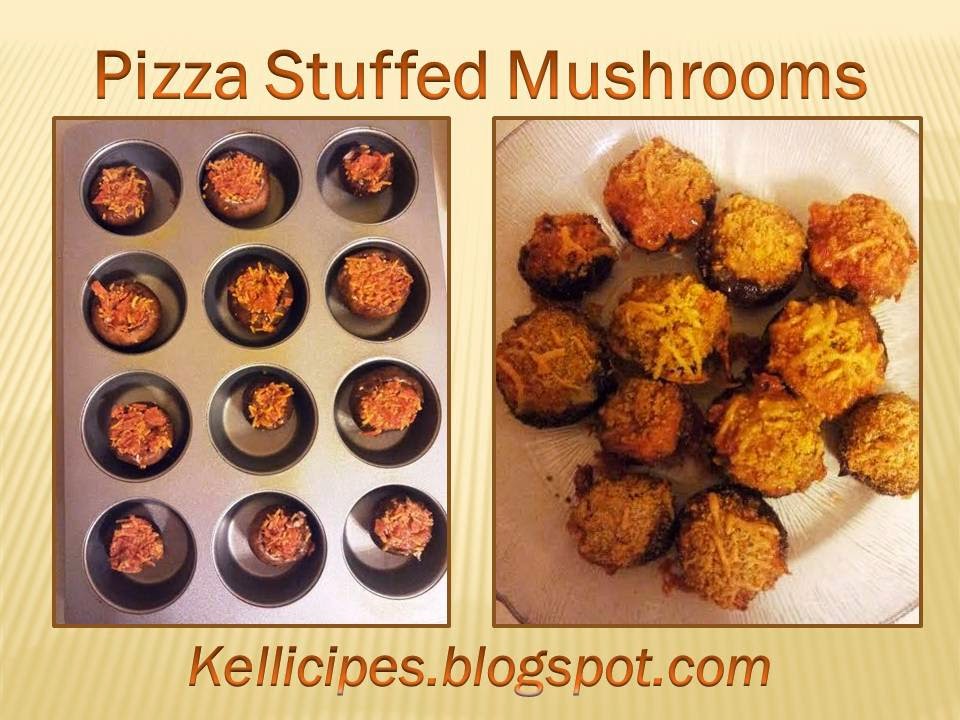
let him go at it. A few minutes later, I went back into the kitchen and was amazed at what I saw...mushrooms in a muffin tin? Genius! We decided to bake them at 350°F for 20 minutes and then topping them off with some more cheese and bread crumbs. Delicious little things! Wow! Now, I'll share with you what I "thought" he used as far as measurements, but really, just use your own judgment, especially because mushroom sizes can vary. I hope you enjoy these as much as we did! To print recipe, click: Pizza Stuffed Mushrooms
Ingredients:
1-8oz package of Baby Bella Mushrooms
1/2 cup Shredded Cheese (We used Pizza Blend)
12-15 Slices of Pepperoni, finely chopped
1 1/2 tablespoons Garlic, minced
1 teaspoon Italian Seasoning
2 tablespoons Marinara sauce or Pizza sauce
2-3 tablespoons Bread Crumbs
1/4 cup Shredded Cheese (Again, we used Pizza Blend but Parmesan would be great too!)
Non-Stick Cooking Spray
Directions:
1) Pre-heat oven to 350°F. Clean mushrooms and remove stems. Using a small spoon, scoop out as much of the interior as you can, to allow room for the stuffing.
2) In a medium bowl, mix the chopped pepperoni, 1/2 shredded cheese, garlic, italian seasoning and marinara sauce.
3) Fill each mushroom with the mixture and place each mushrooms in a 12 cup muffin pan. Spray the top of each cup/mushroom with non-stick spray. Bake for 20 minutes at 350°F.
4) While mushrooms are cooking, in a small bowl, mix together the bread crumbs and 1/4 shredded cheese.
5) Once mushrooms have cooked for 20 minutes, remove from oven and top each mushroom with a bit of the bread crumb/cheese mixture. Bake for an additional 5-7 minutes.

6) Remove from oven, let cool for about 5-10 minutes, then ENJOY!
Copyright © 2013 Kellicipes

Friday, May 23, 2014

Crouton Chicken Parmesan

Who is not a fan of Chicken Parmesan? Right? Well, while searching the internet for a good recipe, I came across this awesome post on foodwishes.blogspot.com and I think this is ingenious! Basically, this is a perfect way to make Chicken Parmesan without getting the "soggy" results when baking chicken that is dredged in breadcrumbs. Add croutons, who knew!?! Major props to this blogger for posting this, because it was a HUGE hit in my household! I modified it a bit with a few ingredients, but if you want their original recipe, click here The end of Chicken Parmesan as you know it. But personally, I like my adjustments and added ingredients, however, you can be the judge! Hope you enjoy it too! To print recipe, click Kellicipes Crouton Chicken Parmesan
Ingredients:
3 LARGE Boneless Chicken Breasts (You can use 6 small ones or cut 3 large ones in half)
Non-Stick Cooking Spray
1 24oz Pasta Sauce, your choice
2 Tablespoons Garlic, Minced
5-7 Bella Baby Mushrooms, Sliced
1/4 White Onion, Chopped
3 Green Onions, Chopped
Hot Pepper Flakes, as desired
Dried Basil, as desired
Italian Seasoning, as desired
Pepper, as desired
8 oz Mozzarella, Shredded (If you're like me, you might need more, ha!)
4 oz Parmesan, Grated or Shredded
1 (5oz) package Herb Seasoned Croutons
Directions:
1) Pre-heat oven to 350°F. Spray a 9x13" baking dish with non-stick cooking spray.
2) Pour enough pasta sauce on the bottom of the baking dish to lightly cover it. Then place the uncooked chicken breasts over the sauce.
3) Sprinkle the garlic, hot pepper flakes, dried basil, italian seasoning and pepper over the chicken breasts.
4) Add mushrooms, white onion and green onion over the chicken breasts.
5) Add a layer of mozzarella cheese over the chicken breasts, then cover with more pasta sauce.
6) Add another layer of mozzarella cheese over the pasta sauce. Now place croutons over the entire dish.
7) Sprinkle remaining mozzarella and then add the parmesan to the top of the dish. Cook for 1 hour or until croutons are crisp and chicken is cooked through.
8) Serve with garlic butter angel hair pasta and crescent rolls. Use the remaining pasta sauce for the chicken and pasta if needed. Enjoy!
Nutrition Facts
Servings 6.0
Amount Per Serving
Calories 359
% Daily Value *
Total Fat 15 g23 %
Saturated Fat 7 g36 %
Monounsaturated Fat 3 g
Polyunsaturated Fat 1 g
Trans Fat 0 g
Cholesterol 75 g25 %
Sodium 1288 mg54 %
Potassium 507 mg14 %
Total Carbohydrate 24 g8 %
Dietary Fiber 3 g13 %
Sugars 8 g
Protein 33 g67 %
Vitamin A1 %
Vitamin C18 %
Calcium5 %
Iron67 %
* The Percent Daily Values are based on a 2,000 calorie diet, so your values may change depending on your calorie needs. The values here may not be 100% accurate because the recipes have not been professionally evaluated nor have they been evaluated by the U.S. FDA.
Copyright © 2013 Kellicipes

Saturday, May 10, 2014

Easy Creamy Coleslaw

Store bough coleslaw is just not the same as when you make it yourself and to be honest, it really doesn't take more than 5 minutes to make (well, about an hour if you chill it). The proof of how awesome this coleslaw tastes is the comment made by one of our houseguests: "I hate coleslaw, it's disgusting. Ok, I'll try it..WOW! That's really good!". As my 5-year old nephew says, "Try it...you might like it!". I wish I could take credit for this simple recipe, but I can't. I found it on a site that featured one of Mr. Food's approved recipes: Mr. Food Coleslaw
The only thing I added was some freshly ground pepper. The key to this recipe is to make the coleslaw and then let it sit in the fridge for about an hour, so that the liquid ingredients soak up the slaw mixture. Just letting it sit for an hour lets the flavors blend beautifully. Hope you enjoy! To print this recipe, click here Easy Creamy Coleslaw
Ingredients:
1/2 cup mayonnaise
1/3 cup milk
1 teaspoon white vinegar
1/4 cup sugar
1/4 teaspoon salt
freshly ground pepper (use your judgment on amount)
1 (16 oz) package cabbage coleslaw mix ( I prefer the tri-colored mix, with carrots, cabbage and red cabbage)
Directions:
1) In a medium mixing bowl, combine the mayonnaise, milk, vinegar, sugar, salt and freshly ground pepper. Mix well with a whisk until creamy and smooth.
2) In a large bowl, add the packaged coleslaw mix, then pour the medium mixing bowl mixture on top of the coleslaw mix. Stir well, cover with foil or plastic wrap and chill in the fridge for at least an hour. **The mixture might not seem creamy just yet, that is why you have to chill it. Once chilled, it will be nice and creamy!**
3) Serve and enjoy! 
Copyright © 2013 Kellicipes

Hash Brown Casserole

Last night we had a barbeque, and it was AMAZING! Burgers, Hot Dogs, Corn on the cob, coleslaw and this super delicious Hash Brown Casserole! I apologize that the photo isn't the greatest, but please take my word for it, this stuff is ADDICTING! Feel free to double the recipe if you have a big crowd. This recipe fed four and looking back, I should have doubled it! To print the recipe click HASH BROWN CASSEROLE
Ingredients:
4 tablespoons butter (additional 2-3 tablespoons if needed, see step 3)
1 pound frozen hash browns (defrosted)
1/2 sweet onion, chopped
1 tablespoon vegetable oil
1 teaspoon garlic powder
1 teaspoon paprika
1 1/2 cups cheddar cheese
1 can cream of chicken soup (or cream of soup of your choice)
salt and pepper
scallions
Directions:
1) Preheat oven to 350°F. Chop onions.
2) In a large hot skillet, melt 4 tablespoons of the butter and add the onions. Cook the onions until they start to brown.
3) Add the defrosted hash browns and tablespoon of vegetable oil. Add the garlic powder and paprika. Cook the hash brown/onion mixture until the hash browns are brown and a bit crispy. You may want to split the mixture into two skillets if your mixture is not browning. I did this and just added 2-3 tablespoons of butter to the second pan before adding half of the mixture.
4) In a large mixing bowl, add the cheese and soup, mix together. Once the hash brown/onion mixture is cooked and crispy, remove from stove and add it to the large bowl with the cheese and soup mixture. Stir until all ingredients are combined. You can add some salt and pepper now or after the casserole is cooked. It's your preference.
5) Spray a 9"x13" baking dish with non-stick cooking spray. Pour the mixture into the baking dish and bake for 30 minutes. You may add more shredded cheddar to the top of the casserole if you like it super cheesy...like me!

6) Remove after 30 minutes and top with sliced scallions (green onions).  Let sit for about 5-10 minutes, then serve with sour cream or ketchup and ENJOY!
Copyright © 2013 Kellicipes

Monday, May 5, 2014

BONKERS FOR BLUEBERRY MUFFINS

I have been trying my best to eat something in the morning for breakfast, but I am NOT a morning person...as you can see below, my Mom thought it was appropriate to buy me these jammies "Crabby in the Morning".
So making breakfast in the morning is pretty much the hardest task of the day for me. I need something already made and easy to eat. What's pre-made, easy to eat and totally delicious? Blueberry Muffins of course!!! I searched long and hard to find the best recipe for Blueberry Muffins and I came across Jenn's recipe at www.eatcakefordinner.net. These muffins are packed with fresh Blueberries and they are HUGE! I made them last night and decided I should wait until the morning to try them. 3:30am...that's the morning, right? I had them on my mind all night that I just couldn't take it anymore and snuck into the kitchen for an early morning taste. DELICIOUS!!! I am pretty sure I will be having one for dessert tonight as well. So hopefully you will feel the same. One quick piece of advice before starting this recipe...DO NOT WEAR LIGHT COLORED CLOTHING or anything that you don't want to stain. When cooking the Blueberries, they sometimes "pop" and you don't want that blue-purple stain on your clothes, or maybe you do...who am I to judge? Alright, enough talk...here's the recipe! To print, click HERE.

Topping:
1/4 cup Sugar
1 1/2 tsp. Grated Lemon Zest
Muffins:
2 cups Fresh Blueberries
1 1/8 cup + 1 tsp. Sugar
2 1/2 cup All-Purpose Flour
2 1/2 tsp. Baking Powder
1 tsp. Salt
2 Large Eggs
4 Tbl. Unsalted Butter, melted & cooled a bit
1/4 cup Vegetable Oil
1 Cup Buttermilk
1 1/2 tsp. Vanilla
Directions:
1) For the topping: Stir the sugar and lemon zest together in a small bowl until mixed well then set aside.
2) For the muffins: Preheat oven to 425°F. Spray a 12 cup muffin tin with non-stick cooking spray.
3) Add 1 cup of the blueberries and 1 tsp. of the sugar to a small saucepan and cook over medium heat. Stir frequently and once they start to darken in color, you will be able to carefully mash the blueberries. Keep cooking and stirring until the sauce is thickened. Then transfer to a small bowl and cool at room temperature while you prepare the rest of the ingredients.
4) In a large bowl, whisk the flour, baking powder and salt together. Set aside.
5) In a medium bowl, whisk the remaining  1 1/8 cups sugar and the 2 eggs together until thick and smooth. Next, whisk in the butter and oil. Finally, whisk in the buttermilk and vanilla until all ingredients are combined and smooth.
6) Using a rubber spatula, pour and fold the contents of the medium bowl into the large bowl with the flour mixture. Stir until the mixture is combined, but still a bit lumpy. Now add the remaining cup of fresh blueberries (NOT THE COOKED BERRIES). Stir well, but remember the mixture will still be a bit lumpy, you don't need to over stir this mixture.
7) Fill the muffin cups half way with the batter. Then top with a teaspoon of the cooked berry mixture. Take a toothpick and swirl together. Repeat that process once more. The muffin cups should be filled all the way to the top. Finally, top the muffins with the lemon sugar.
8) Bake for 9 minutes then rotate the muffin pan in the oven. Bake for another 9 minutes or until the muffin tops are firm. Remove from oven and use a toothpick to check and see if they are cooked all the way through. Place the toothpick down the middle of each muffin. If you remove it and the toothpick is clean, then they're cooked! If not, put back in the oven for a few minutes.  **These muffins will puff up and overflow a bit out of the cups. Don't worry, they'll still pop out of the tin just fine, once cooled**
9) Cool the muffins in the muffin pan for 5-10 minutes. Then remove them and place on a wire rack to cool for an additional 5-10 minutes before serving. Enjoy!
Nutrition Facts
Servings 12.0
Amount Per Serving
Calories 285
% Daily Value *
Total Fat 10 g15 %
Saturated Fat 3 g15 %
Monounsaturated Fat 3 g
Polyunsaturated Fat 2 g
Trans Fat 0 g
Cholesterol 42 g14 %
Sodium 321 mg13 %
Potassium 88 mg3 %
Total Carbohydrate 45 g15 %
Dietary Fiber 1 g5 %
Sugars 24 g
Protein 4 g9 %
Vitamin A0 %
Vitamin C7 %
Calcium1 %
Iron44 %
* The Percent Daily Values are based on a 2,000 calorie diet, so your values may change depending on your calorie needs. The values here may not be 100% accurate because the recipes have not been professionally evaluated nor have they been evaluated by the U.S. FDA.
Copyright © 2013 Kellicipes

Friday, May 2, 2014

Brother's Tasty Summer Salad

I love my Brother and thought I knew pretty much everything about him...but I didn't. HE CAN COOK! While visiting him last month, he and his wife cooked up some delicious food! My favorite was this salad. I can't tell you how awesome it is! I would have never thought to put these ingredients together and so I am delighted to have experienced this dish and share it with you! Super easy and super delicious! Stay tuned for his awesome Tawook Grilled Cauliflower recipe! Click here for RECIPE
Ingredients:
2 Romaine Lettuce bunches/stalks, chopped
1 can Chick peas, drained and rinsed
1 can Corn, drained OR 1-2 cobs of Corn, grilled
1 cup fresh Cilantro, chopped
1 cup fresh Basil, chopped
1 cup Feta Cheese, crumbled
Dressing of your choice
Salt and Pepper if desired
Directions:
1) Chop your Romaine, Cilantro and Basil.  Toss together then set aside.
2) Drain the Corn and heat over medium heat on a skillet that has been sprayed with non-stick spray, cooking until corn is slightly brown. You can also grill your corn on the grill by wrapping it in foil.
3) Add the cooked corn and drained chick peas to the lettuce mixture.
4) Top with Feta Cheese and toss with your favorite dressing. You can add salt and pepper if desired. I like Italian, Greek or a Vinaigrette with this salad. Enjoy!
Nutrition Facts
Servings 4.0
Amount Per Serving
Calories 253
% Daily Value *
Total Fat 11 g17 %
Saturated Fat 6 g28 %
Monounsaturated Fat 2 g
Polyunsaturated Fat 0 g
Trans Fat 0 g
Cholesterol 33 g11 %
Sodium 747 mg31 %
Potassium 406 mg12 %
Total Carbohydrate 26 g9 %
Dietary Fiber 5 g22 %
Sugars 4 g
Protein 13 g26 %
Vitamin A7 %
Vitamin C122 %
Calcium4 %
Iron177 %
* The Percent Daily Values are based on a 2,000 calorie diet, so your values may change depending on your calorie needs. The values here may not be 100% accurate because the recipes have not been professionally evaluated nor have they been evaluated by the U.S. FDA.
Copyright © 2013 Kellicipes