Tuesday, December 31, 2013

Incredible Spinach Artichoke Dip

Back in my College days, I used to work at a Michigan based steakhouse, Brann's Steakhouse. In addition to their fabulous steaks, they also have an incredible Spinach Artichoke Dip. But here's the thing, they came in frozen patties that we would microwave, then serve. How could I know the exact ingredients? I remember my girlfriends and I sneaking the frozen patties in our waitress aprons at the end of the night so we could make the dip at home! Yes, I was a bad girl....but hey, it was college, anything goes, right? :) Anyway, since then, I have been trying to find that one Spinach Artichoke Dip recipe that could live up to the one at Brann's Steakhouse. I found it today. I was browsing Pinterest and came across Natasha's Kitchen which has an amazing recipe for the dip. It's New Year's Eve...I MUST MAKE THIS! I only changed the ending of the recipe and well, I didn't use low fat ingredients, but otherwise, she hit the jackpot with this one! Here it is! To print this recipe without photos, click: PRINT RECIPE
Ingredients:
1 10oz frozen package of Spinach, thawed and drained well
8 oz Cream Cheese, room temperature
16 oz Sour Cream
1 stick Unsalted Butter, room temperature
2 cups shredded Parmesan Cheese
14 oz can quartered Artichoke Hearts, drained and coarsely chopped.
4 oz can diced Jalapenos, drained
3 Garlic cloves, pressed
1 tablespoon Freshly Ground Pepper
1/2 cup shredded Cheddar
Directions:
1) Preheat oven to 350°F.


2) In a medium pot over medium heat, add together the cream cheese, sour cream, butter and parmesan cheese. Make sure to stir well until full melted and an even consistency.


 3) Stir in chopped artichoke hearts, jalapenos, spinach , pressed garlic cloves and freshly ground pepper.


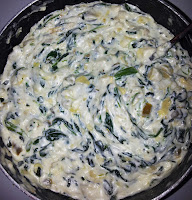
This is what it should look like...don't be discouraged if you think your initial ingredients look "curdled". Just keep stirring with a whisk or fork. The clumpiness is mostly because of the shredded cheese.


4) In a baking dish sprayed with non-stick cooking spray, transfer the mixture to the dish and bake for about 10-15 minutes at 350°F until bubbly and the top starts to brown.


5) Remove baking dish from oven and top with the shredded cheddar cheese. Crank up the oven to broil and broil for about 3-5 minutes, or until the cheddar cheese is bubbly and a bit browned.


6) Serve with chips, veggies or toasted baguettes!


Nutrition Facts
Servings 10.0
Amount Per Serving
Calories 321
% Daily Value *
Total Fat 25 g38 %
Saturated Fat 16 g78 %
Monounsaturated Fat 7 g
Polyunsaturated Fat 1 g
Trans Fat 0 g
Cholesterol 74 g25 %
Sodium 817 mg34 %
Potassium 73 mg2 %
Total Carbohydrate 7 g2 %
Dietary Fiber 2 g7 %
Sugars 2 g
Protein 17 g35 %
Vitamin A1 %
Vitamin C29 %
Calcium4 %
Iron48 %
* The Percent Daily Values are based on a 2,000 calorie diet, so your values may change depending on your calorie needs. The values here may not be 100% accurate because the recipes have not been professionally evaluated nor have they been evaluated by the U.S. FDA.
Copyright © 2013 Kellicipes

Sausage Cheesy Crescent Bites

Sausage bread has always been a tradition in my family on Christmas morning. If I could have it my way, I would eat sausage bread every day, all day! It's so delicious! Homemade bread, hot sausage, Velveeta cheese....what more could you ask for?! I REALLY wanted to make it for New Year's Eve, but didn't have the time or patience to make the REAL recipe. SOOOO....with my new love for Pillsbury Croissants, I decided to cheat the recipe a bit and make an easier but still just as tasty version! Sorry I didn't snap a photo of the ingredients, they are really simple, I just had so much stuff on my counters this evening while preparing all the appetizers, that I got lazy and skipped that step. But here it is, I guarantee you that you will not be disappointed! These tasty little things are AMAZING! For the full recipe and directions without photos, click: PRINT HERE ***I made one small edit to this recipe, when adding the cheese slices to the crescents, smush them a bit in the sausage mixture first, then top with a little more sausage. It makes it a lot easier to roll, not so messy***
Ingredients:
1 lb Premium Pork Sausage - I like to use the HOT flavored sausage
1/2 cup Fresh Parsley, finely chopped
1 tube of Pillsbury Crescents (You can use 2 tubes if you want less sausage in each crescent...there is a lot of sausage!)
About 4 slices of Velveeta Cheese, cut in half
2 Tablespoons of butter, melted
1 Tablespoon minced Garlic (Optional)
Directions:
1) Pre-heat oven to 350°F.


2) In a medium skillet, cook sausage until fully cooked and browned.


3) Drain sausage and set aside.


4) Finely chop fresh parsley, about 1/2 cup. Make sure the parsley is rinsed and dry before chopping.


5) Add chopped parsley to sausage and toss. Set aside or in the refrigerator to cool down.


6) Once sausage has cooled down, slice about 4 slices of Velveeta cheese and cut each slice in half.


7) Place the Pillsbury Crescent dough onto a baking sheet that has been sprayed with non-stick cooking spray.


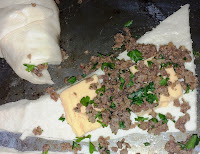
8) Place 2 pieces of Velveeta (actually one slice, just cut in half) on to each crescent. See note above about smushing the cheese into the sausage mixture first, makes it a lot easier :)


9) Scoop about a tablespoon of the sausage/parsley mixture on top of the cheese.


10) Roll each crescent up and pinch the sides to try and keep the cheese and sausage inside. THIS PART IS KIND OF MESSY, BUT DON'T WORRY!


11) Brush each crescent with melted butter (add garlic to the butter if you want extra flavor).
12) Bake at 350°F for 10 minutes.


13) Remove from oven and brush the crescent once more with the butter mixture and bake for 5 minutes longer.


14) Remove from oven and let cool for about 5-10 minutes and dig in! 


Nutrition Facts
Servings 8.0
Amount Per Serving
Calories 403
% Daily Value *
Total Fat 29 g45 %
Saturated Fat 13 g66 %
Monounsaturated Fat 8 g
Polyunsaturated Fat 2 g
Trans Fat 0 g
Cholesterol 60 g20 %
Sodium 1297 mg54 %
Potassium 198 mg6 %
Total Carbohydrate 17 g6 %
Dietary Fiber 0 g1 %
Sugars 6 g
Protein 16 g32 %
Vitamin A0 %
Vitamin C15 %
Calcium2 %
Iron44 %
* The Percent Daily Values are based on a 2,000 calorie diet, so your values may change depending on your calorie needs. The values here may not be 100% accurate because the recipes have not been professionally evaluated nor have they been evaluated by the U.S. FDA.
Copyright © 2013 Kellicipes

Saturday, December 28, 2013

Chicken Enchilada Cornbread Pie

Enchiladas sounded yummy tonight, but I didn't feel like taking the time to make the recipe....rolling all those enchiladas....too much! So I found this Chicken Enchilada Cornbread Pie recipe on Tablespoon that seemed easy enough to make! The main man of the house loves cornbread, so I thought I couldn't go wrong. Notice that the original recipe calls for 1 cup of cheese...well, you know me! I had to add more! The more cheese the better, right?! I would also recommend that you use rotisserie chicken if you want some added flavor. I just cooked some chicken breasts and then shredded them myself. Either way, tastes good. Finally, I think if I make this recipe again, I might add a cornbread base crust and bake it before adding the mixture. It was a bit oozy, but still good this way. In fact, I think tomorrow I might take some of the interior mixture and spread it over tortilla chips....and of course, ADD MORE CHEESE! That would be SO good! To print recipe without photos, click: PRINT
Ingredients:
2 teaspoons vegetable oil
1 small white onion, diced
1 jalapeno, seeded and diced
1 (10oz) can enchilada sauce
1 cup salsa
2 cups shredded cooked chicken
1 (15oz) can black beans, rinsed and drained
2 to 2 1/2 cups shredded mexican cheese (divided)
1 (6.5oz) pouch Betty Crocker cornbread mix
1/3 cup milk
1 egg
2 tablespoons melted butter
Directions:
1) Preheat oven to 350°F. Heat the oil in a medium skillet over medium-high heat. Add onion and jalapeno and cook until the onion is translucent, about 5-7 minutes.


2) Transfer onion and jalapeno mixture to a large bowl. Add enchilada sauce, salsa, chicken, black beans, about 1 1/2 to 2 cups of cheese and stir all ingredients until mixed.


3) Transfer mixture to a pie plate that has been greased with cooking spray. Pat the mixture down with a spoon so it is even.


4) In a separate bowl, mix together the cornbread mix, milk, egg and melted butter until completely smooth.


5) Spoon the cornbread mixture over the top of the enchilada mixture until the entire pie is covered.


6) Bake for 15-20 minutes until the cornbread topping is set and the edges start to brown.


7) Remove pie from oven and top with remaining cheese, then bake for about another 5 minutes.


8) Once cheese is melted, remove pie from oven and let sit for about 10-15 minutes before serving. If you don't want it to be too oozy, let stand for about 20-30 minutes before serving.


ENJOY!!!


Nutrition Facts
Servings 6.0
Amount Per Serving
Calories 566
% Daily Value *
Total Fat 22 g34 %
Saturated Fat 9 g44 %
Monounsaturated Fat 3 g
Polyunsaturated Fat 1 g
Trans Fat 0 g
Cholesterol 113 g38 %
Sodium 687 mg29 %
Potassium 551 mg16 %
Total Carbohydrate 54 g18 %
Dietary Fiber 8 g31 %
Sugars 4 g
Protein 36 g73 %
Vitamin A0 %
Vitamin C8 %
Calcium3 %
Iron76 %
* The Percent Daily Values are based on a 2,000 calorie diet, so your values may change depending on your calorie needs. The values here may not be 100% accurate because the recipes have not been professionally evaluated nor have they been evaluated by the U.S. FDA.
Copyright © 2013 Kellicipes